- Lego 42110 Land Rover defender Лучший набор техник 2019
- Найдены возможные дубликаты
- Правила сообщества
- Дефендерчик
- Lego Land Rover Defender
- «Защитник» — Land Rover Defender 1975 Series III
- Обзор на Конструктор LEGO® Technic™ 42110 Land Rover Defender
- LEGO Technic 42110 Land Rover Defender ultimate repair guide
- Introduction
- Drive train walk trough, how does it work
- Body removal guide
- Building errors based on steps
- Step 3 – incorrect gear used, issue at step 62
- Step 4 – rear differential direction swap
- Step 45 – gears swapped or not placed correctly
- Step 65 – small cross block inserted incorrectly
- Step 74 – small cross block inserted incorrectly
- Step 84 – small cross block inserted incorrectly
- Step 88-89 – U-joint orientation
- Step 102 – Red 2L axle
- Step 104-106 – rear suspension – lower attachment point of the springs
- Step 134 – front differential direction swap
- Step 152-154 – front suspension – lower attachment point of the springs
- Step 259-261 – correct assembly of the DNR and Hi/Lo selectors
- Step 271 – correct gear usage
- Step 272 – U joint should not touch the 24 tooth gear
- Verification steps
- What shall work at the end of bag 1 at step 123
- Verification of all functions at step 321
- General advises
- Problems that are not really problems
- Left/right or front/rear wheels are turning in the opposite direction
- Step 62 – wheels are not turning the gears in the gearbox
- End of bag 1 – wheels are not turning the gears in the gearbox
- What to do if everything is built correctly and the gears are still cracking
Lego 42110 Land Rover defender Лучший набор техник 2019
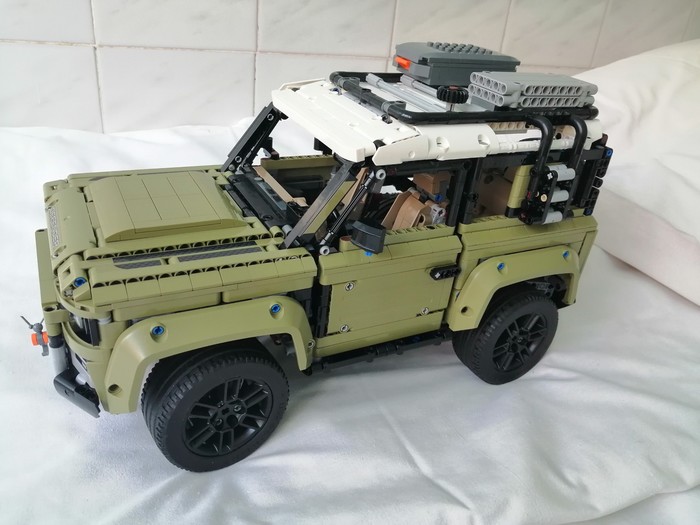
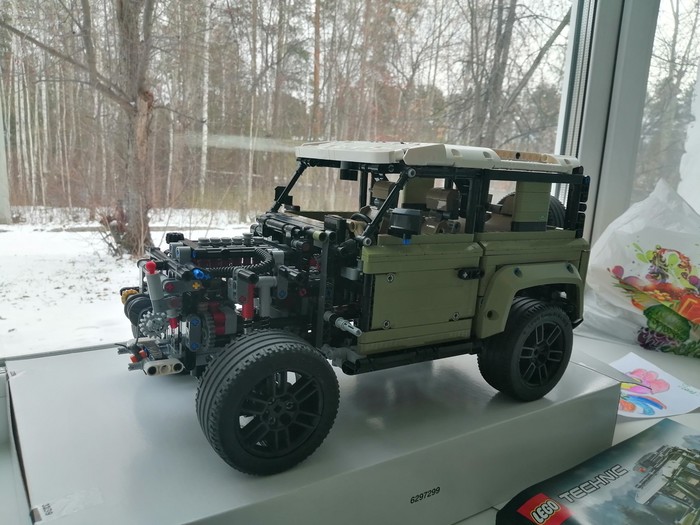
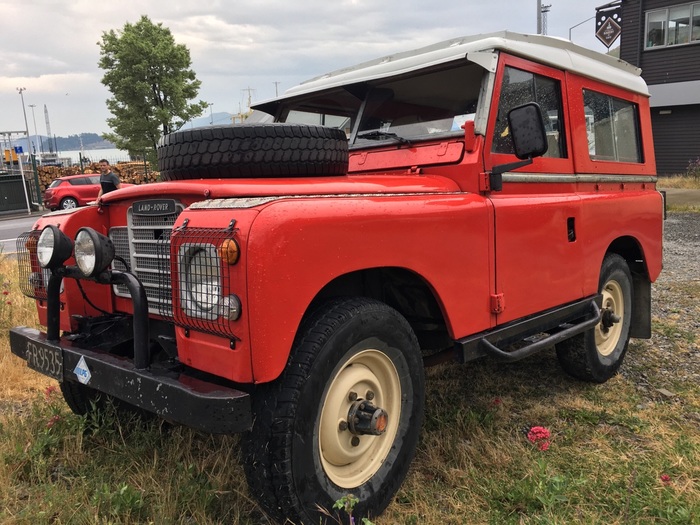
На днях приобрёл себе набор 42110, когда появились первые фото интереса набор не вызвал, ну что в нём интересного обычный большой автомобиль. Я ошибся он оказался хоть и обычным, но очень крутым)
Набор состоит из 2573 деталей, на сегодняшний день не так много, но всё равно прилично. Рекомендованная цена 14999р, дофига, но лего дорогое
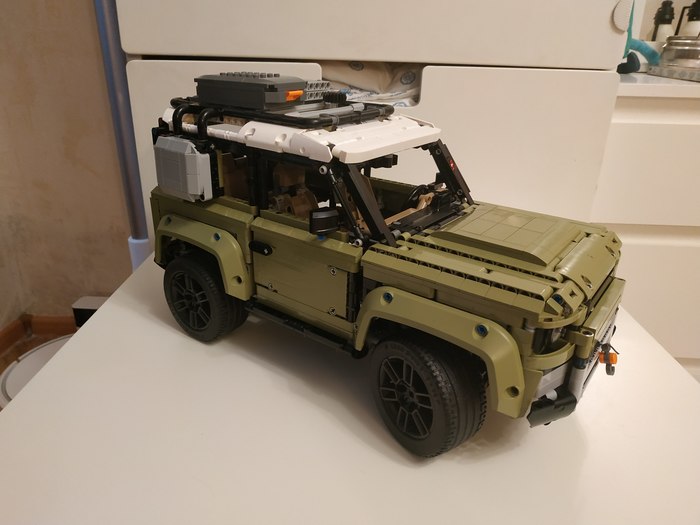
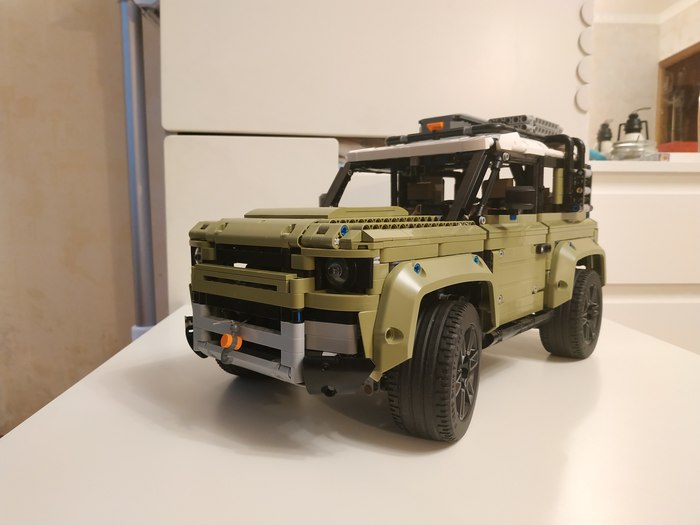
Прототипом для набора послужил новый дефендер, как и у настоящей машины набор оснащён полным приводом, независимой подвеской на все колёса и 6 цилиндровым двигателем
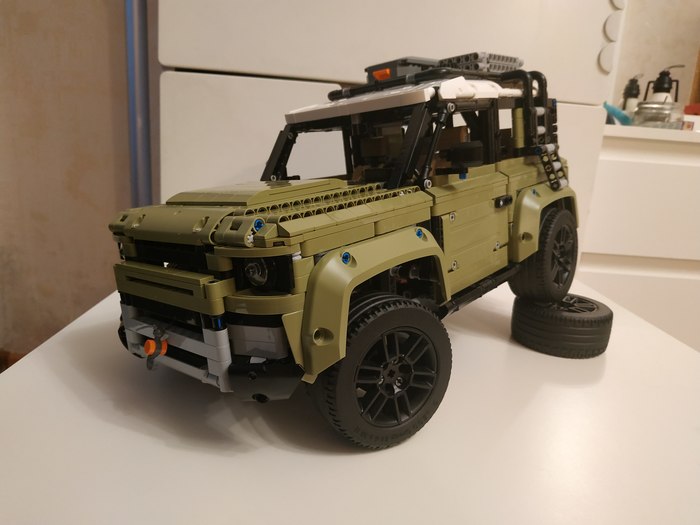
трансмиссия со всеми дифференциалами (два межколёсных и один межосевой)
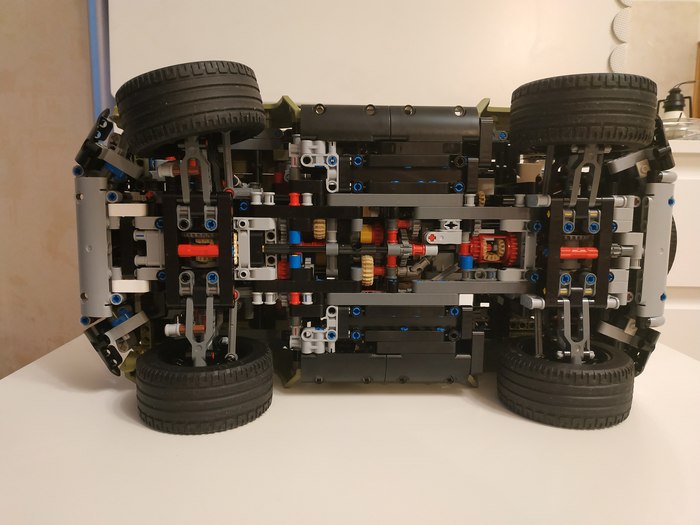
Коробка передач по заявлению лего самая сложная из когда либо выходивших наборов, тут точно соглашусь

передач 4, переключаются чёрным цилиндром (его надо крутить), серый рычаг отвечает за режимы D N R, второй рычаг с чёрной шестернёй за понижающую передачу
Коробка получилось большой поэтому её часть торчит в багажнике

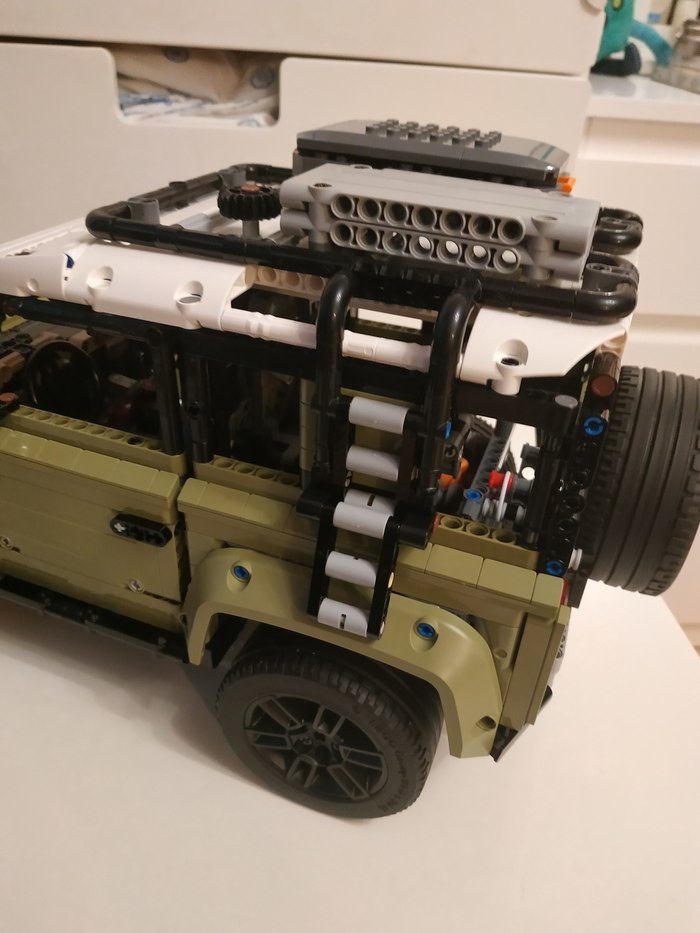
На крыше есть доп оснащение как и у настоящей машины: кофр, лестница и сендтраки
В наборе наконец появились колёса с реалистичным вылетом, я этого очень долго ждал
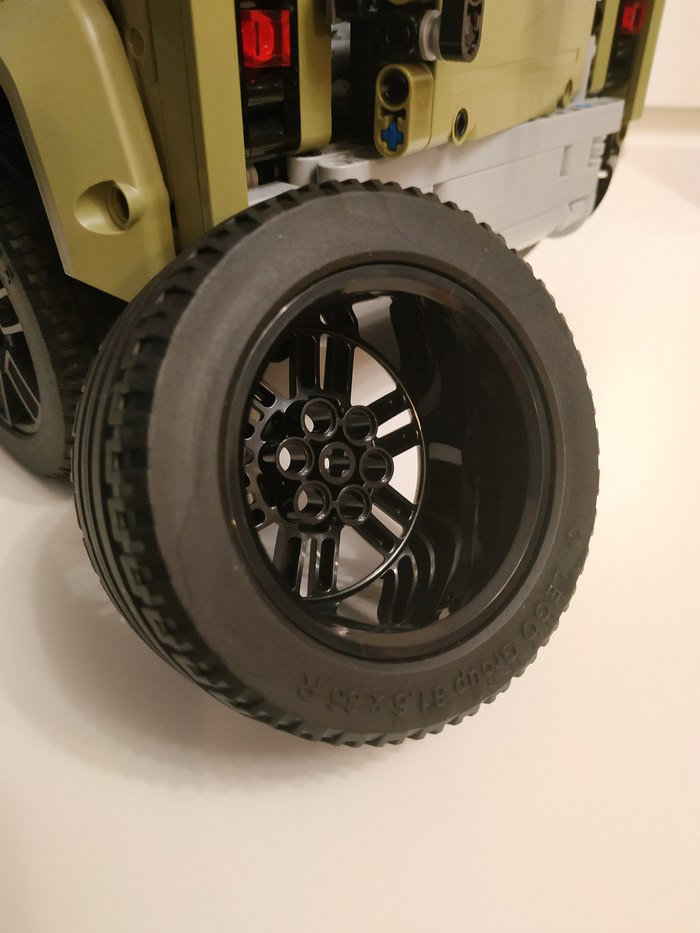
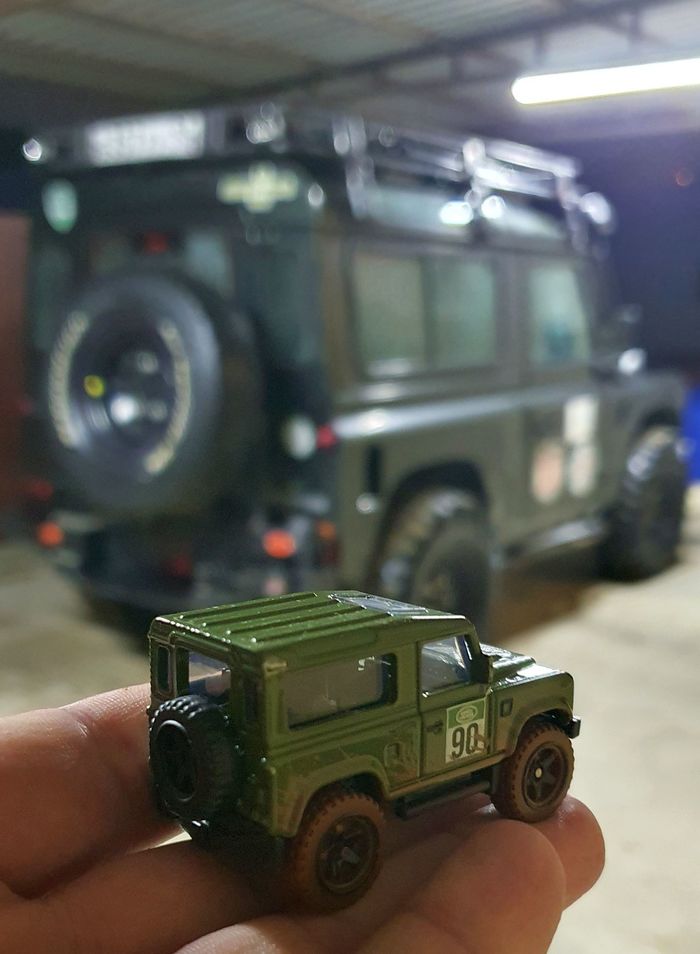
Фото настоящей машины:

Видео с обзором модели:
Спасибо за внимание, если у вас есть вопросы с удовольствием отвечу на них в комментариях)
Найдены возможные дубликаты

1.7K постов 5.5K подписчиков
Правила сообщества
— Уважайте друг друга.
— Не присваивайте чужие работы.
— Тематика группы: LEGO. Аналоги допускаются.
— Не спамить, не флудить, не вбрасывать.
— Если правила сайта не понятны, я пропишу отдельно в правилах сообщества: НИКАКОЙ РЕКЛАМЫ. Вообще. Реселлеров, магазинов, частных лиц и прочего.
Немного не по теме. Скажите, есть ли у вас опыт полировки деталей lego? Есть старые наборы типа того как на фото. Большие элементы, которые должны быть глянцевыми и прозрачные «стекла» со временем поистрепались и зашоркались. Как и чем их можно отполировать?


Дефендерчик
Не котик и не собачка 🙂

Lego Land Rover Defender
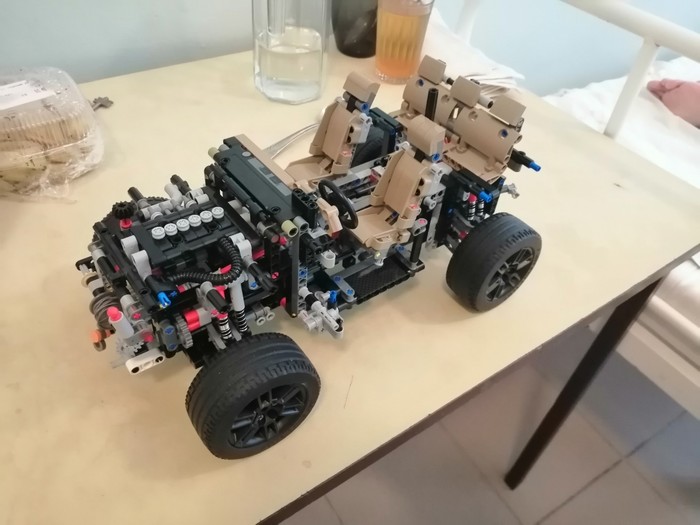
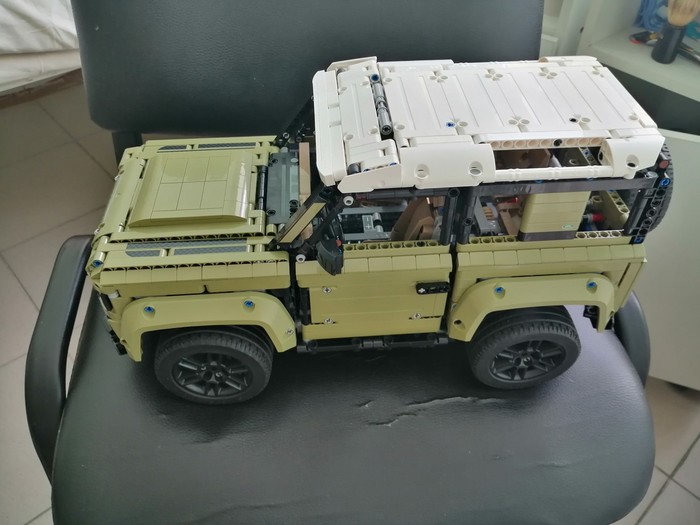
Привет всем кто решится прочитать этот пост. В ноябре 2019 года я загремел в инфекцию с пневмонией. Как раз пришел очередной набор 42110 и я решил его забрать в больнице. Фото сделано на моей больничной кровати. На данный момент я считаю его самым лучшим из всей моей колекции техник. Фото коллекции будет в конце поста. Этот набор содержит 2573 детали и на момент выхода обошелся мне в 10 тыс.
Чем же так хорош этот набор? Во-первых — функционал: 4 ступенчатая кпп, понижающая передача, 6 цилиндровый рядный мотор, рабочая лебёдка с трещёткой, подвеска на амортизаторах, полноразмерное запасное колесо, ручка управления на крыше, набор аксесуаров. Во-вторых — внешний вид. В-третьих -цена. В-четвертых — играбельность, эта модель подходит не только для полки. И главное нет серьезных косяков, как у ultimate моделей.
Инструкция обычная без дополнительной информации о реальном авто. Есть две серьезные ошибки, из-за которых ваш мотор будет трещать на высоких передачах. Обратите внимание на установку двух карданов идущих из КПП.
Собирал я её в маленькой палате на 3 человек, откуда меня не выпускали 3 недели. На фото сборки должно быть видно интерьер палаты. В реальности палата была еще хуже.
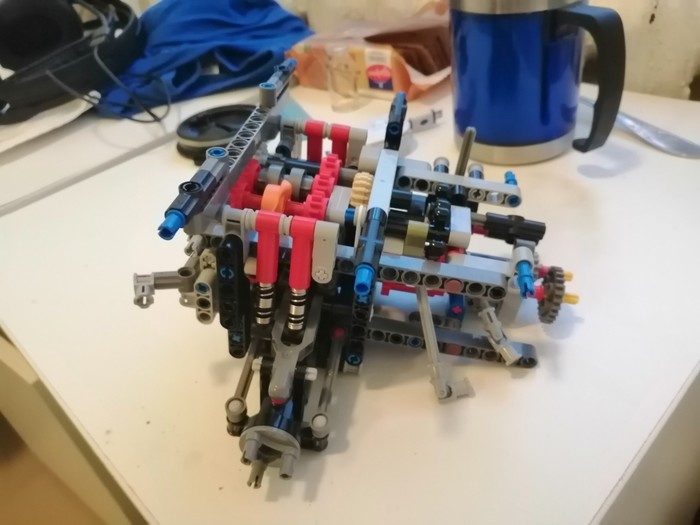
КПП и задний мост в этой модели собираются компактно. Видно два проблемных кардана. В первый раз я собрал их по инструкции, а потом сидел в недоумении — почему не работает?
«Свадьба» передней и задней части авто. На этом шаге можно понять правильно ли работает КПП.
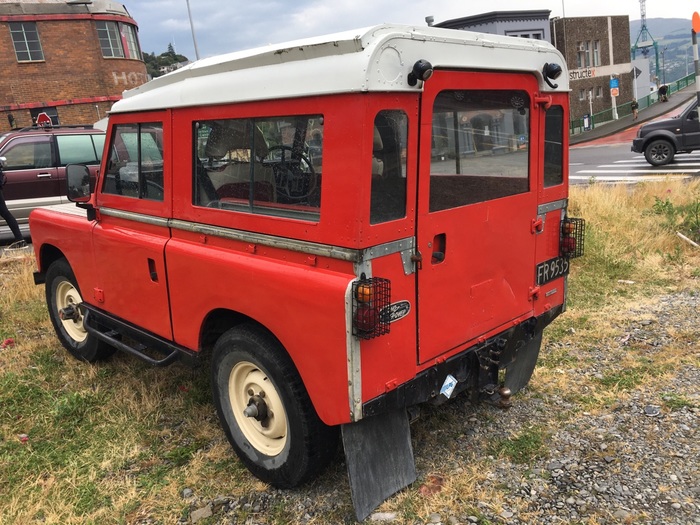
Чтобы открыть заднюю дверь — поверни запасное колесо.
На этом фото видно лебёдку и механизм трещётки.

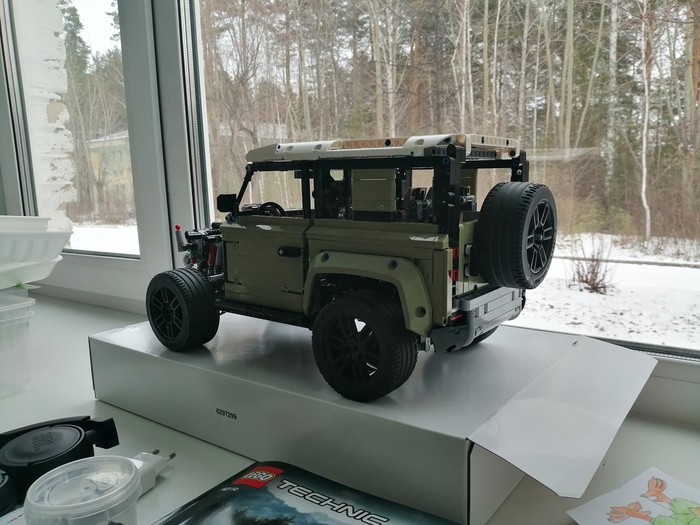
Авто собрано, но без аксесуаров на крыше.
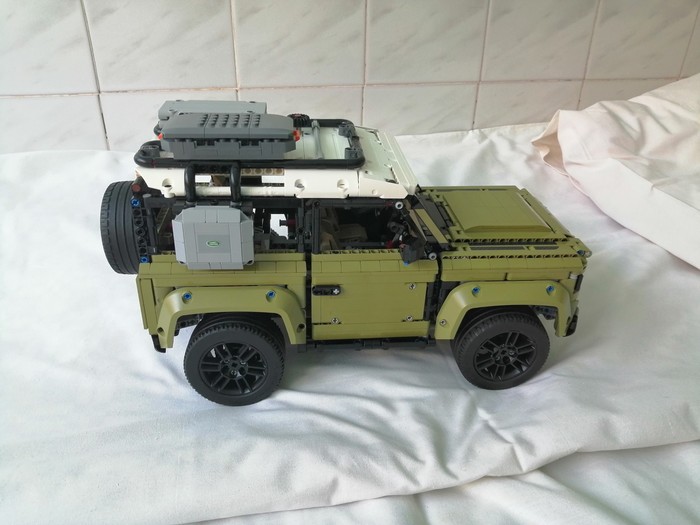
Окончательный вид после сборки. Оба кейса открываются.
Дле тех кто долистал до конца поста — фото моих авто из серии техник. Ребёнок недавно стащил их к себе в комнату. В кадре присутствуют не только модели техник.


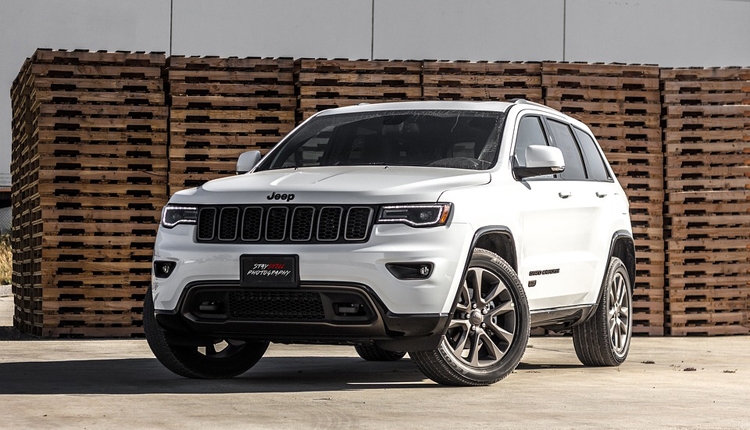
«Защитник» — Land Rover Defender 1975 Series III
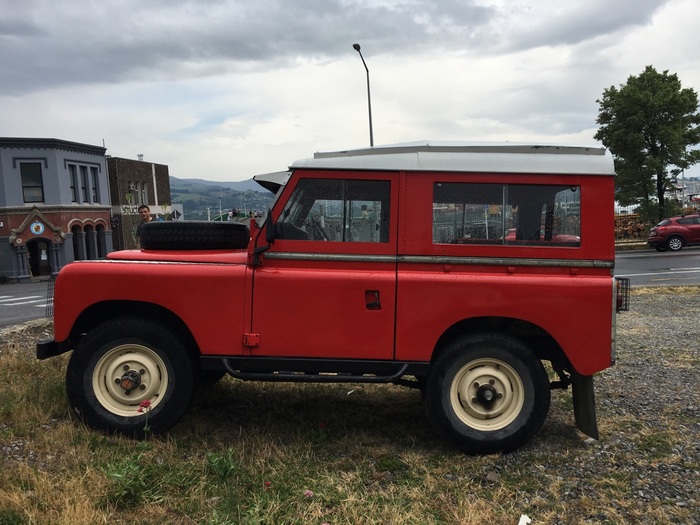


Land Rover Defender — внедорожник известной британской компании. Первая серия внедорожников был построена под впечатлением Jeep Willys.
Серия III является наиболее распространенным серийным транспортным средством, 440 000 автомобилей этого типа были построенных с 1971 по 1985 годы. У серии III были те же самые варианты кузова и двигателя, что и у предыдущей серии II. Мало что изменилось косметически. В соответствии с тенденциями автомобильного дизайна начала 1970-х годов, как с точки зрения безопасности, так и использования более совершенных материалов, простая металлическая приборная панель более ранних моделей была переработана с учетом новой литой пластиковой панели.
У 2,25-литрового двигателя была увеличена степень сжатия с 7:1 до 8:1, что несколько увеличило мощность. Моторы шли от 2,25 л. 73 hp до 3,5 л. 93 hp, и был также представлен дизельный 2,25 л. 63 hp.
Подвеска в зависимости от серии была либо полностью зависимая с листовыми рессорами, либо с передней независимой — пружинной. Все модели имеют постоянный привод на четыре колеса (4WD) и только небольшая часть с передним.
В 1992 году компания Land Rover заявила, что 70 % всех транспортных средств этого типа ещё используется. Также они до сих пор используются в армиях ряда стран (в частности Омана и Тонга) и частными лицами.
Источник
Обзор на Конструктор LEGO® Technic™ 42110 Land Rover Defender

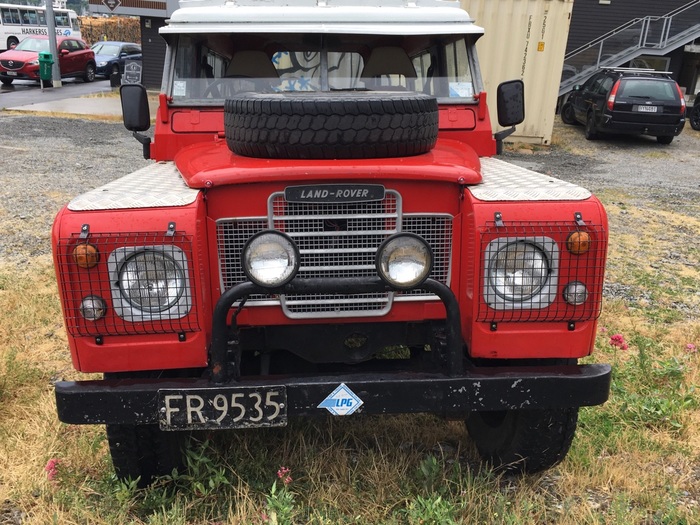
Именно так выглядит все содержимое этого прекрасного, без преувеличения, набора Лего. Как Вы уже поняли, это аутентичная коллекционная модель Land Rover Defender. Данный комплект создавался при участии Land Rover. Отличается высокой степенью детализирования. На фото Вы можете наблюдать, как выглядит 2573 тыс. деталей конструкции. Элементы для сборки удобно разделены по пакетикам которые пронумерованы для удобства сборки. В инструкции будет указание, что Вам понадобится на данном этапе сборки. Инструкция, как и декоративные наклейки, запакованы отдельно от всего остального. Без отельной упаковки остались только покрышки.
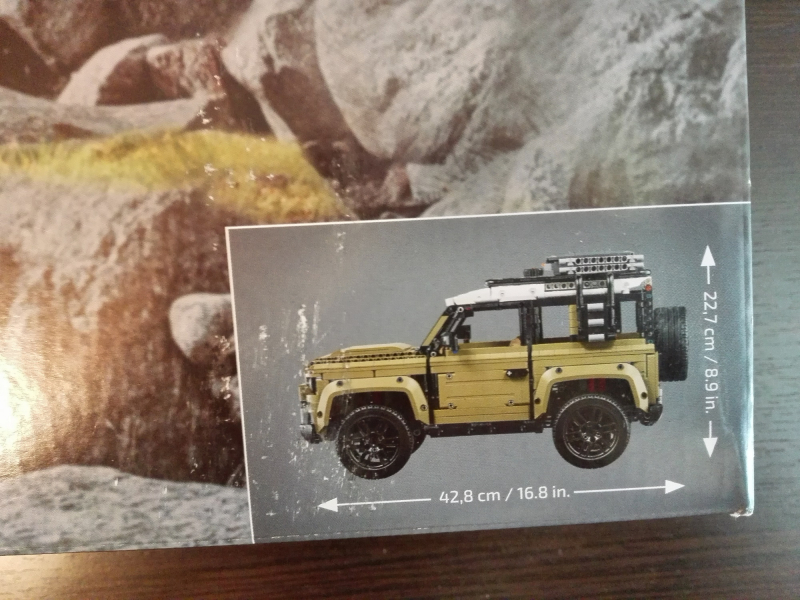
Привожу фото с указанием размера модели. Ширина же составляет 20 см. Для наглядности можете представить себе это с помощью линейки. Модель далеко не мелкая, поэтому очень солидно смотрится на полке. Моделька в собранном виде смотрится целостно, не дыряво, в отличии от некоторых наборов Лего Техник. Данная модель без стеснения может собираться взрослым человеком и затем стать стильной частью интерьера. Иными словами, она не выглядит как детский конструктор.


Фото коробки с разных сторон. На обратной стороне коробки приводится фото разных функций модели. На торце есть пример размера колесного диска в масштабе 1:1.

Такова толщина инструкции для сборки. Да, она внушительна. Правда степень последовательности и точность описания сборки крайне сильно упрошена, все-таки набор рассчитан и для детей. В инструкции 860 этапов сборки. Каждый крупный и сложный элемент модельки выведен в отдельный раздел.

Привожу фото иллюстрации с перечислением всех элементов конструктора. Само собой, большое количество деталей составляют элементы крепежа. Элементы кузова добавляют гладкости и обтекаемости модели внедорожника. Это добавляет законченности и лаконичности.


Это фото некоторых, частично готовых элементов модельки. На первом фото по отдельности представлена коробка передач и часть ходовой конструкции. На следующей фотографии эти элементы объединены. Данные фото приведены для наглядности того, как проходит сборка поэтапно и как элементы складываются в единое целое. Также можно увидеть детальность агрегатов. То есть в данной модели применяется не просто имитация чего-то за счет внешнего вида, все технические части модельки функционируют и двигаются. Не стоит забывать, что это внедорожник. Тут полный привод и 3 дифференциала. Так же 4 ступенчатая коробка передач и линейный 6 цилиндровый двигатель. И все это функционирует и взаимодействует между собой. В данной модельке также реализована независимая подвеска. Есть ещё и полностью рабочая лебедка.

Размер покрышки в сопоставлении с зажигалкой. И это только размер колеса! В общем размере модели это достаточно небольшой элемент.
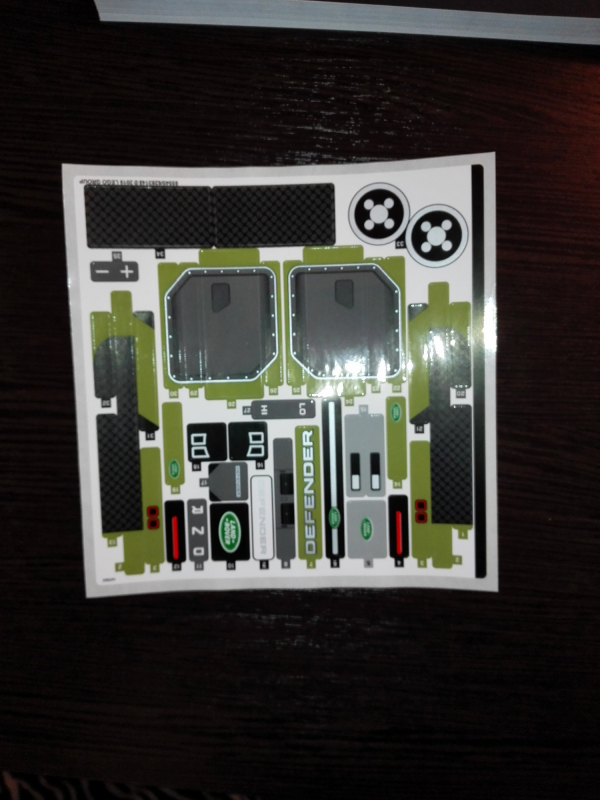
Набор декоративных наклеек вблизи. При детальном рассмотрении можно увидеть какие функции управления будут доступны. Переключение коробки передач, селектор повышенной и пониженной передачи.
Рассказывать о данном наборе можно долго, как и показывать множество фотографий. Но, чтобы не испортить удовольствие от сборки и знакомства с этим набором, не буду перегружать Вас информацией. В итоге хочу отметить высокое качество инженерной работы, изготовления деталей и эстетическое удовольствие от готовой сборки. В общем, у Лего снова получилось сделать классный конструктор. Рекомендую к сборке.
Источник
LEGO Technic 42110 Land Rover Defender ultimate repair guide

Introduction
I shared many videos with you about the LEGO Technic Land Rover Defender already, you saw my detailed building review, the details of the drive train and the one about the cracking noise and the possible fixes. I received hundreds of comments from you and many-many requests for help, hopefully in most of the cases I was able to assist to find the proper solution.
I decided to create a summary and a video about all the potential issues I found during the building process. I’ll also go through the drive train from the wheels to the engine, how to verify your build, and what are the problems that are not really problems. Each section is linked to the proper part of the video, use the summery below to find the section you are looking for:
Drive train walk trough, how does it work
I go through the drive train from the wheels up to the engine to demonstrate how it works. I suggest to watch it to have a better understanding on the mechanism, it helps to find the issue with your build.
Body removal guide
This section shows you how to remove the body of the car in bigger pieces to gain access to the internals
Building errors based on steps
Step 3 – incorrect gear used, issue at step 62
Error: a 12 tooth black gear is used at step 3 instead of the 8 tooth dark bluish gray gear
Symptom: the two assemblies cannot be properly joined at step 62, the axle won’t turn
Step 4 – rear differential direction swap
Error: The orientation of the differential is important at step 4
Symptom: If one of the two differentials is built in reversed then the front and rear wheels will work against each other and the central differential won’t turn, it won’t drive the gearbox and the engine. Click here to see how does it look like.
How to fix with a finished build : Follow these instructions:
Step 45 – gears swapped or not placed correctly
Error: If incorrect gears are used at step 45 then the assembly cannot be completed
Step 65 – small cross block inserted incorrectly
Error: a common mistake that can be made a lot of times in this build. If the #6536 Technic cross block is inserted incorrectly then the axle that supposed to turn freely in the pin hole will be blocked in the axle hole.
Symptom: The rear wheels does not turn when the car is pushed on the ground as the output of the rear differential is blocked
How to fix with a finished build : Follow these instructions:
Step 74 – small cross block inserted incorrectly

Error: a common mistake that can be made a lot of times in this build. If the #6536 Technic cross block is inserted incorrectly then the axle that supposed to turn freely in the pin hole will be blocked in the axle hole.
Symptom: The central differential or the gearbox is blocked
Step 84 – small cross block inserted incorrectly
Error: a common mistake that can be made a lot of times in this build. If the #6536 Technic cross block is inserted incorrectly then the axle that supposed to turn freely in the pin hole will be blocked in the axle hole.
Symptom: The central differential is blocked
Step 88-89 – U-joint orientation
Error: if the universal joints on the input and output shafts of the gearbox are not aligned correctly
Symptom: the drive train will not run smoothly and in higher gears you’ll hear a cracking noise.
How to fix with a finished build: Follow these steps:
Step 102 – Red 2L axle
Error: if the 2L red axle is not pushed in then the some beams will not be linked together and the structure becomes unstable
Step 104-106 – rear suspension – lower attachment point of the springs
Error: The lower attachment point of the springs in the rear suspension are chosen incorrectly, the inner hole is used on the suspension arm instead of the outer axle hole
Symptom: the suspension will not work properly and the whole rear of the car will sit lower than the front
How to fix with a finished build: follow these steps:
Step 134 – front differential direction swap
Error: The direction of the differential is important at step 134
Symptom: If one of the two differentials is built in reversed then the front and rear wheels will work against each other and the central differential won’t turn, it won’t drive the gearbox and the engine.
How to fix with a finished build : Same as the fix for Step 4
Step 152-154 – front suspension – lower attachment point of the springs
Error: The lower attachment point of the springs in the front suspension are chosen incorrectly, the inner hole is used on the suspension arm instead of the outer axle hole
Symptom: the suspension will not work properly and the whole front of the car will sit lower than the rear
How to fix with a finished build : Same as the fix for Step 104-106
Step 259-261 – correct assembly of the DNR and Hi/Lo selectors
Error: the assembly of the DNR and the Hi/Lo selector requires a lot of parts to be aligned correctly, if there’s a mistake they won’t work properly
Step 271 – correct gear usage
Error – if the dark bluish gray 8 tooth gear is not added at step 271 or an incorrect one is used then the front wheels won’t drive the central differential
Symptom: The front wheels are not driving the central differential
Step 272 – U joint should not touch the 24 tooth gear
Error: The U-joint on the input shaft of the gearbox is placed incorrectly and it touches the 24 tooth gear next to it
Symptom: Cracking noise coming from the drive train
How to fix with a finished build: Follow these steps:
Verification steps
I suggest to follow these verification steps to see if everything works correctly at that stage.
What shall work at the end of bag 1 at step 123
Verification of all functions at step 321
General advises
- There should be no bigger pieces or gears left after any building stages. You can see the list of the leftover parts here at the end of the inventory. If you have any bigger parts left after finishing a section go back and find where it belongs.
Problems that are not really problems
Left/right or front/rear wheels are turning in the opposite direction
Step 62 – wheels are not turning the gears in the gearbox
At this stage the wheels are not yet connected to the gearbox
End of bag 1 – wheels are not turning the gears in the gearbox
At this stage the wheels are not yet connected to the gearbox
What to do if everything is built correctly and the gears are still cracking
As you see in the video, if the car is still cracking then the best solution is to take it apart and try to rebuild it with everything aligned properly. There’s no ultimate fix for the cracking, you need to verify each section carefully to ensure a smooth operation.
There is one additional thing you can try to fix the cracking if everything else fails, although this falls in the “might or might not work” category. For some people flipping both differentials at the front and rear axle eliminates the cracking.
Fantastic, job well done, Thanks a million !
My central differential (red thing) is stuck. Please help me
I suggest to follow the troubleshooting steps in the article
The pistons do not move up and down when I roll the car. Am I setting the shifting properly?
Hi! My car is only making crackling noises when the highest gear (4) is in use… It runs smooth on all the lower gears (1-3). What can I do to solve that kind of problem? Any suggestions?
Check all potential issues, if no solution then dismantle, rebuild, verify each phase during build.
Same 🙁 but if I roll the wheels slowly without rapid movements cracking noise disappeares. So it might be just the friction
Did you manage to fix the clicking in high gear? I’ve re built the whole car following all of the above steps and still have the same problem?
Try rolling the car backwards (and not forward), but still on D. Does it work that way and doesn’t crack? If that’s the case, flip both the front and rear differentials so their large side is facing the passenger side of the car.
Wow, thank you so much that actually worked
As far as I understand, there are two gears that are offset to each other (one that comes from the differentials and one that is connected to the DNR gears) which have a better grip on each other on this specific rotation direction. Flipping both differentials effectively swaps their rotation direction.
^^^ This fixed our build as well. Many thanks.
This comment is the one! You’ve just spared me from driving myself nuts! Thankyou!
como se llama el programa que utiliza para simular en 3D y utra pregunta la transmision truena mucho podria agregarle un poko de aceite de maquina de coser …
saludos excelente su perfil
Don’t put oil in it, it’ll ruin your build. The 3d program is LDCad – http://www.melkert.net/LDCad
Um… I did everything but it is still cracking and my car is bought in new less than a week, so someone please help me for the annoying cracking from my new car.
I’ve often found that newer LEGO sets gears have more friction, as they get used they wear down and run more smoothly. Run it a lot, disassemble it if you have to, but over time the gears should run smoothly.
I’ve built my model but when I turn the red diff (in front of the grey one) all the wheels turn, however when I turn the front or rear diff only the respective diffs turn up to the centre diff. My engine does not operate only when I turn the cog in the boot Also I don’t think my gearbox/hi-Lo or +\- fines done seem to do anything thing??
I’m struggling to get the pistons to move.
I’ve followed the guide posted above it all appears to be in order but yet, the pistons will not go up and down when the car moves.
Does anyone have any idea?
Remove the body, put the car in D, then follow the guide that shows how the drive train works from the wheels until the engine. If something does not move as it is supposed to move, you’ll find the source of the problem.
Hi! I like this a lot but I must have Done something Wrong I cant steer my front Wheeling Will not turn.
Hi, I had the same issue and went back. In my case, one of the small pins in number 132 was upside down. For both, the top level should be equal to the brick, the very small part that sticks out should be at the bottom.
Hi, love the guide but I’m still having issues. I can only get the pistons to work when in R. I’ve rebuilt the whole gearbox several times but cannot get it to work in D.
Please help
Thanks
If it does work in R but not in D then check the Hi/Lo selector and the gearbox itself. Does the input shaft of the gearbox rotate when you push the car? Does the output shaft rotate? You can narrow down the issue if you have a look at my video, understand what parts should be engaged when it’s in D and compare it to your build.
Did you manage to fix this issue? I’m having the exact same issue works fine in R but if try to run in D will go so far and then will run backward when I pick it up. Its so frustrating and I really don’t want to have to take to bits again.
Hi mate did you find out what the issue is I’m having the same dam problem. Works in R but like binds fights against each other in D when u pick it up it’s like a wind up car.
The U Joints are placed correctly,the red diferencial cracks in Most Gears and the engine doesnt works good.
Please Help me.
My problem was not listed. Both the rear wheels are incapable of moving in the same direction and the entire rear gearbox is wont move and will make the cracking sounds if forced. I think the problem is that there is a gear that is stuck in the back, but I was wondering if this was a more common problem.
Check the video which axles and gears should be able to rotate and verify them in your build
Had the same issue. The gray piece that the axl goes into was in wrong which did not allow the gear to move at all.
Very helpful guide. Thanks ! After going through the steps I’m left with a strange issue. I get cracking noises only in 1st and 2nd gears (both Hi and Lo). Is this a known/fixable issue ?
The cracking is quite difficult to eliminate fully, you need to have every gear/axle and piece aligned without adding extra tension to the drive train.
Is it possible that in the newest production run some of the manual issues have been resolved?
The mistake with the U-joint alignment was corrected already some time ago in both the printed and the online manuals, I’m not sure if there’s anything else to correct.
I’m sorry, I misunderstood what these errors are; they’re common mistakes, not errors in the manual. Thank you for clarifying, and even more for putting all of this together!
When in gear, my front and back wheels spin against each other… all differentials appear to be in the correct orientations (the larger end of the differentials are both along the left side of the car).. tried doing a rebuild of bags 1 and 2… still no luck..
Any suggestions to try??
My front and rear wheels spin against each other when in drive… all differentials appear to be in correct orientations…. I noticed when I spin the small grey gear that connects far right side u connector with the gears that move the pistons, manually, the wheels spin correctly…
Hi, I love this site. Thanks for sharing this info. I figured out one of the problems I had. But, I have a big question remaining. The gear in my car works if I pull the shifts, but nothing happend and also the motor ins’t running. https://youtu.be/Qz8FYlMixQI
Can you help? Hoping to hear from you.
Did you check the differentials?
I fixed some clacking due to u joint connections hitting gears. Thanks.
But in the highest gear, or lowest – I can’t tell – the car acts like pull back wind up toy. Either the pistons do nothing and then go in a fast burst. Or if I push the vehicle and then lift the wheels they unwind in the opposite direction! 🙁 In other gears it’s ok.
Differential orientation is correct and my u joints are aligned thanks to you. Any thoughts?
Hi Douglas, I have same issue with engine and gears not moving much and then running really fast. Also if you push the car forwards it then starts to run backwards! Did you find the cause ? About to go for a rebuild here. Thanks
Hi Jim, I have the same issue here. Have you managed to solve it?
I really enjoyed watching the whole video, thank you very much for putting it together!
Thank you for this guide !
Step 88-89 above fixed the cracking noise. Good thing it was an easy fix, just had to remove 1 seat and 1 door.
Do you have any videos for building steps 206-246, I’m on my third go building this section and every time I connect everything up the engine does nothing when I move the various cogs. The selectors appear to be in the right position but they don’t do anything in terms of engaging different gears.
Also on my fifth go of trying to make the wheels all go in the same direction as each other. I own more than twenty bits of Lego technic and no kit has flummoxed me like this ! Almost getting to the point where I’m not enjoying it.
I only have the video that you see in this post. Try to follow the drive train from the wheels from the central differential and see which gears are engaged.
Thanks, I’ll try again. I’m a Lego enthusiast not an engineer or a mechanic, I think for this build you need to be the latter. I’m obviously making the same mistake every time because the instructions aren’t clear enough to me as a non-mechanic.
Slightly different problem for me. It runs okay in reverse in lowest gear (i.e. engine turning over fastest), but clicks when pushed forward. Does anyone have any ideas?
I should clarify when I say ‘reverse’ I mean pushing it backwards. The gear selector is in ‘D’ in both circumstances.
Fantastic! That’s not cracking anymore! Thanks for all. You’r the best!!
i have the mistake instructions in step 89 the u joints are wrong position but you help guide help me a lot i build this set like you after 2 bags (number one and number 2) i put wheels on land rover and test if anything works wrong and everything was correct thanks you help guide i build land rover complety today and everything works smooth if you hadnt made these videos i would be in trouble like step 89 im maybe could have built wrong
i have two problems. i have the shifter on D, at 1st or 2nd gear it’s ok bot on 3rd and 4th i hear the carcking noise. if the shifter is on R then all the gears (1-4) are ok. the other problem is that if i steer the wheels at the roof then it feels a little bit hard to steer but if i steer on the steering wheel inside the car or if i steer the wheels from the actual wheels it feels even more harder. Can you help please?
Sorry for my bad english.
I am not sure the order of the 4 gears is correct. In the sense that they don’t go from faster to slower as I rotate the selector, they seem in some random order. Could you please double check on your and tell me how the orange gear selector is positioned when the lower (-) gear is selected? Thanks!
I have the same problem but only in D mode. Everything is checked and still no results.
Really appreciate the effort going into this blog and the videos. Very helpful! I watched it prior to my full rebuild of the model and it helped me in avoiding the U-joint mistake.
My situation is that I have no cracking noise as which is caused by the mis-aligned U-joints. Also no cases of the wheel turning backwards once you pick it up. All gears are working and the fake engine is moving. So basically I think I have the build correct. However, I do find the resistance that the model has in High gear a bit unpleasant. More specifically only in D/Hi/2 and D/Hi/3 you notice that the output shaft is playing catchup sometimes and thereś just more stress on the drivetrain as I would like. (I am unable to make it crack, even when driving it very quickly) I would still want/desire a more smooth/fluid experience but I am at a point of believing it is simply not possible to get everything running buttery smooth on this model. (I think this is also what RacingBrick indicates in his videos).
@RacingBrick: at those moments when you demo what sounds “normal”, dropping the music would be helpful! 😀
– Gearbox alone is smooth (ratating in and out shafts)
– Fake engine is smooth (when using R)
– DNR and Hi/Lo selector is smooth
> Just when everything is together with those high gears…
Maybe it’s time to let it rest and just build the body of the car.
I think this is pretty much the maximum you can achieve, it will not be smoother than that. Just take a look at all the plastic gears working together (with their tolerance rate) and you will understand why it works like this. To make it better a drastic simplification would be needed.
Yes, I think you’re right. But it sure feels nice having you confirm that once again. 😉 Thanks again for all your efforts, really enjoy your content!
Источник